> For clean Markdown of any page, append .md to the page URL.
> For a complete documentation index, see https://hiddenlayer.ferndocs.com/llms.txt.
> For AI client integration (Claude Code, Cursor, etc.), connect to the MCP server at https://hiddenlayer.ferndocs.com/_mcp/server.
# Single Sign-On Guide for HiddenLayer AI Security Platform
The HiddenLayer AI Security Platform has SAML application integrations to allow users to use single-sign-on for the Console to streamline the authentication process for their users. The Console supports SAML 2.0 and should work with any provider that supports SAML 2.0.
## SSO Setup
Administrators can configure the Console login with their single sign-on Identity Provider (IdP).
1. In the Console, go to **Settings > SSO**. The Service Providers Details tab displays the data needed to establish a trusted connection between your IdP and HiddenLayer.
**Expand**
: Service Providers Details tab descriptions
* **Assertion Consumer Service (ACS) Callback URL**: Endpoint on a service provider (SP) that receives and parses a SAML assertion made by the identity provider (IdP).
* **Secondary Assertion Consumer Service (ACS) Callback URL**: If you do not enable request signature validation in your IdP configuration, this URL is necessary to add as an allowable alternative ACS URL.
* **Issuer**: Unique string that identifies the provider issuing a SAML request.
* **Metadata URL**: Provides SAML metadata information, which can be used to configure the application in the IdP as an SP.
* **Single Logout (SLO) URL**: Single Logout (SLO) is a feature in federated authentication that allows end users to automatically sign out of their IdP session when they end their HiddenLayer session.
* **Request Signing Certificate**: The certificate used to sign SAML requests sent by the SP. If you choose to validate the request signature you will need to upload these contents into your SP.
2. After entering the HiddenLayer Service Provider Details into your IdP's integration configuration, take the details provided by your IdP and enter it into the Configure SAML SSO tab.
**Expand**
: Configure SAML SSO tab descriptions
* **IdP SSO URL**: The address that an IdP supplies to redirect users for authentication.
* **Issuer**: Entity that manages, creates, and maintains identity information for principals. It also provides authentication services to relying parties.
* **Managed Domains**: Domains that are managed by the IdP.
* **Provider Public Certificate**: Used to verify the authenticity of requests and messages.
3. Enable the **Is IdP Initiation Enabled** checkbox to allow your IdP to initiate the SAML v2 flow.
4. Click **Save**.
## Example IdP Setups
This guide provides the following as examples:
* [Microsoft Entra](#microsoft_entra)
* [Okta](#okta)
### Microsoft Entra
#### Prerequisites
Before creating an app integration in Microsoft Entra, you need the following information from HiddenLayer Support.
* **Identifier (Entity ID)** - this could be called the Issuer.
* **Reply URL** - this could be called the ACS or Callback URL.
* **SP-initiated Callback URL**
#### Create Enterprise Application
After receiving the SSO information from HiddenLayer, create an Enterprise Application in Azure.
1. In the Azure console, search for and select **Enterprise Applications**.
2. Click **New application**.
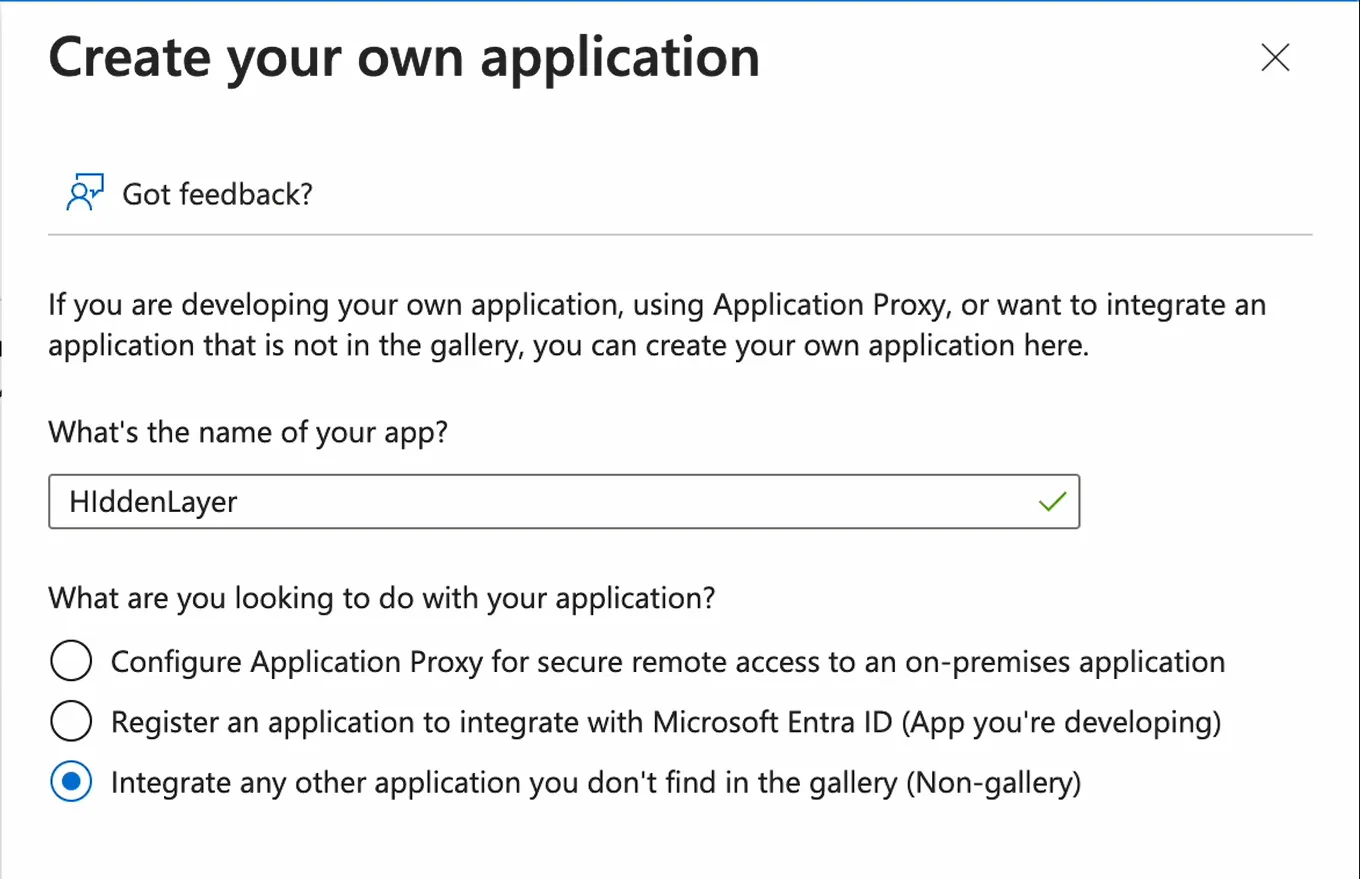
3. Click **Create your own application**.
4. Enter a name for the application. Example: HiddenLayer.
* Make sure **Integrate any other application you don’t find in the gallery (Non-gallery)** is selected.
5. Click **Create**. It may take a few moments to create the application. When the application is created, the Overview page displays.
6. Expand Manage, then select **Single sign-on**.
7. Click **SAML**.
8. For Basic SAML Configuration, click the **Edit** button.
9. Under Identifier (Entity ID), click **Add identifier**.
* Copy and paste the **Issuer** from HiddenLayer Console (see [SSO Setup](#sso-setup) above).
10. Under Reply URL (Assertion Consumer Service URL), click **Add reply URL**.
* Copy and paste the **Assertion Consumer Service (ACS) Callback URL** from HiddenLayer into the field.
* Make sure Default is selected. When Entra initiates a sign-on, this is the URL to use.
* Under Reply URL, click **Add reply URL** to add a second URL.
* Copy and paste the **Secondary Assertion Consumer Service (ACS) Callback URL** you received from HiddenLayer into the field.
* Click **Save**.
11. **Optional**: Configure Sign-on URL (only required for SP-initiated SSO).
**Note**: Skip this step if you only plan to use IDP-initiated SSO. SP-initiated flows will fail without a populated Sign-on URL.
* For the Sign on URL, enter the SP-initiated Callback URL for your region.
* US region: [https://console.us.hiddenlayer.ai/](https://console.us.hiddenlayer.ai/)
* EU region: [https://console.eu.hiddenlayer.ai/](https://console.eu.hiddenlayer.ai/)
* Click **Save**.
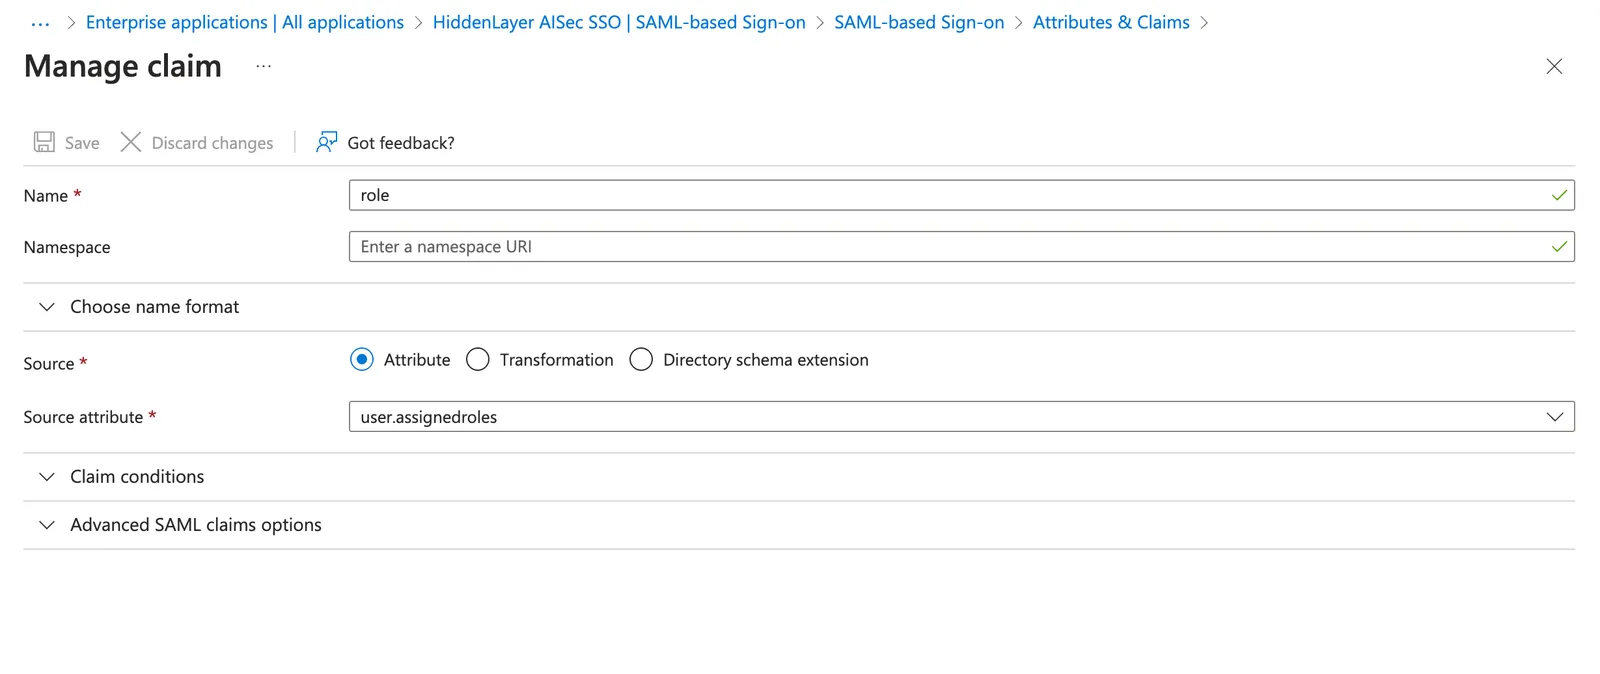
12. For user-based role assignments, edit the Attributes & Claims. Make sure you are on the **Manage > Single sign-on** page for the application.
* For Attributes & Claims, click the **Edit** button.
* Click **Add new claim**.
* For Name, enter `role`.
* For Source attribute, select `user.assignedroles`.
* Leave the namespace blank.
* Click **Save**.
13. After the Enterprise Application is created, be sure to assign users or groups to the application.
* Go to Microsoft Entra ID.
* Under Manage, select **App registrations**.
* Select your HiddenLayer application. You might need to click the **All applications** tab.
* In your HiddenLayer application, select **Manage > App roles**.
* Click **Create app role**.
* Create separate app roles for Org Admin, Analyst, and Viewer.
* Viewer
* Display name: Viewer
* Allowed member types: Users/Groups
* Value: viewer
* Description: HiddenLayer Viewer Role
* Analyst
* Display name: Analyst
* Allowed member types: Users/Groups
* Value: analyst
* Description: HiddenLayer Analyst Role
* Org Admin
* Display name: Org Admin
* Allowed member types: Users/Groups
* Value: admin
* Description: HiddenLayer Admin Role
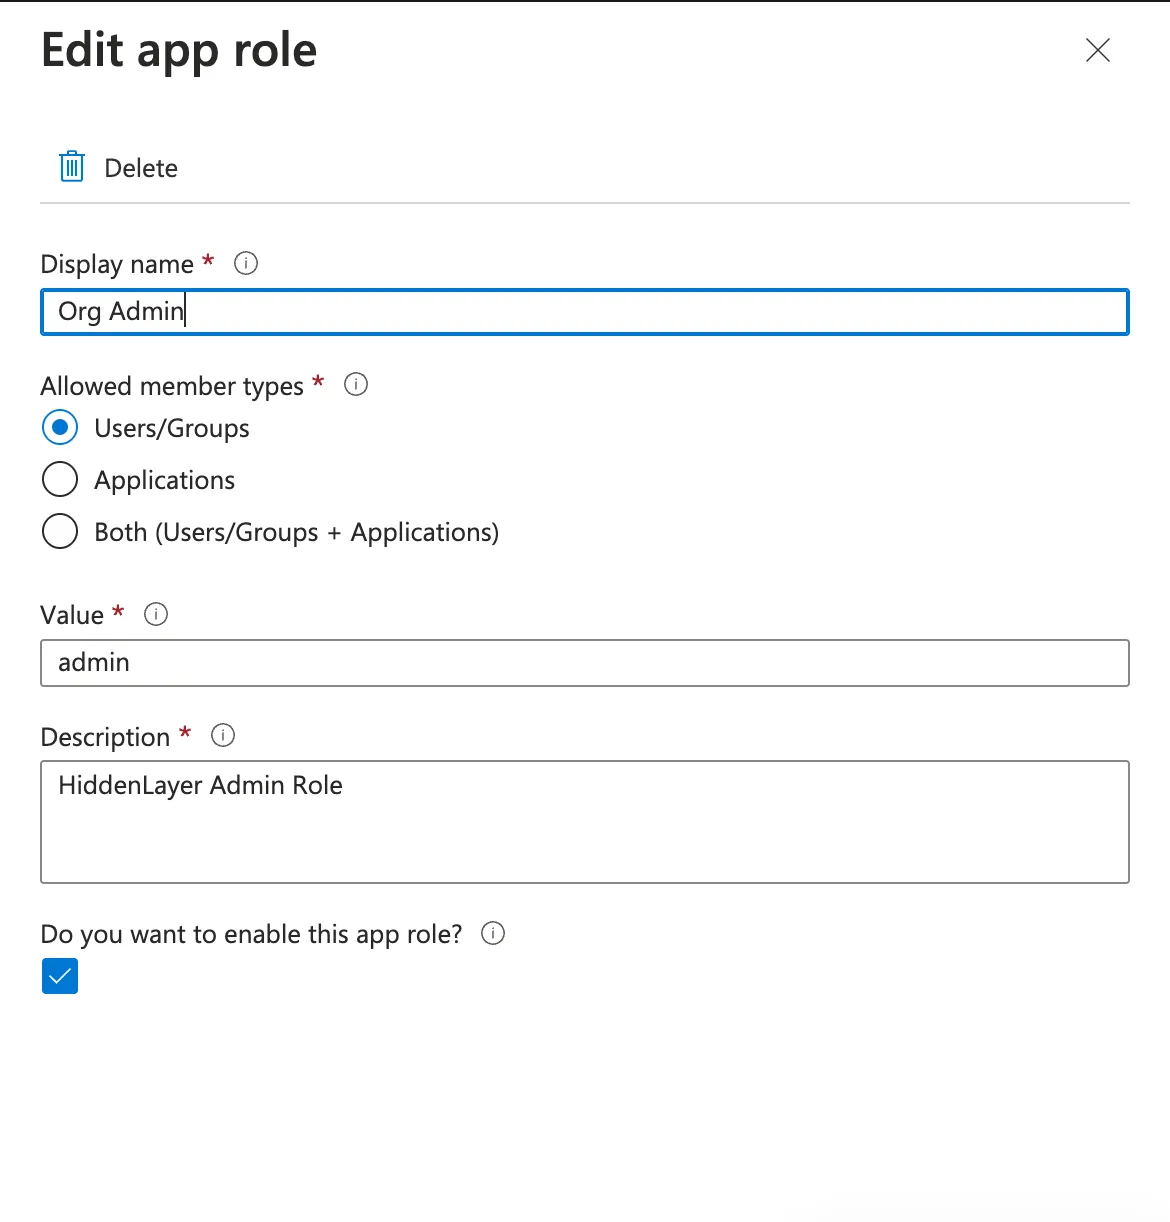
* Click **Apply** to save each app role.
* Assign your users to these roles, as needed.
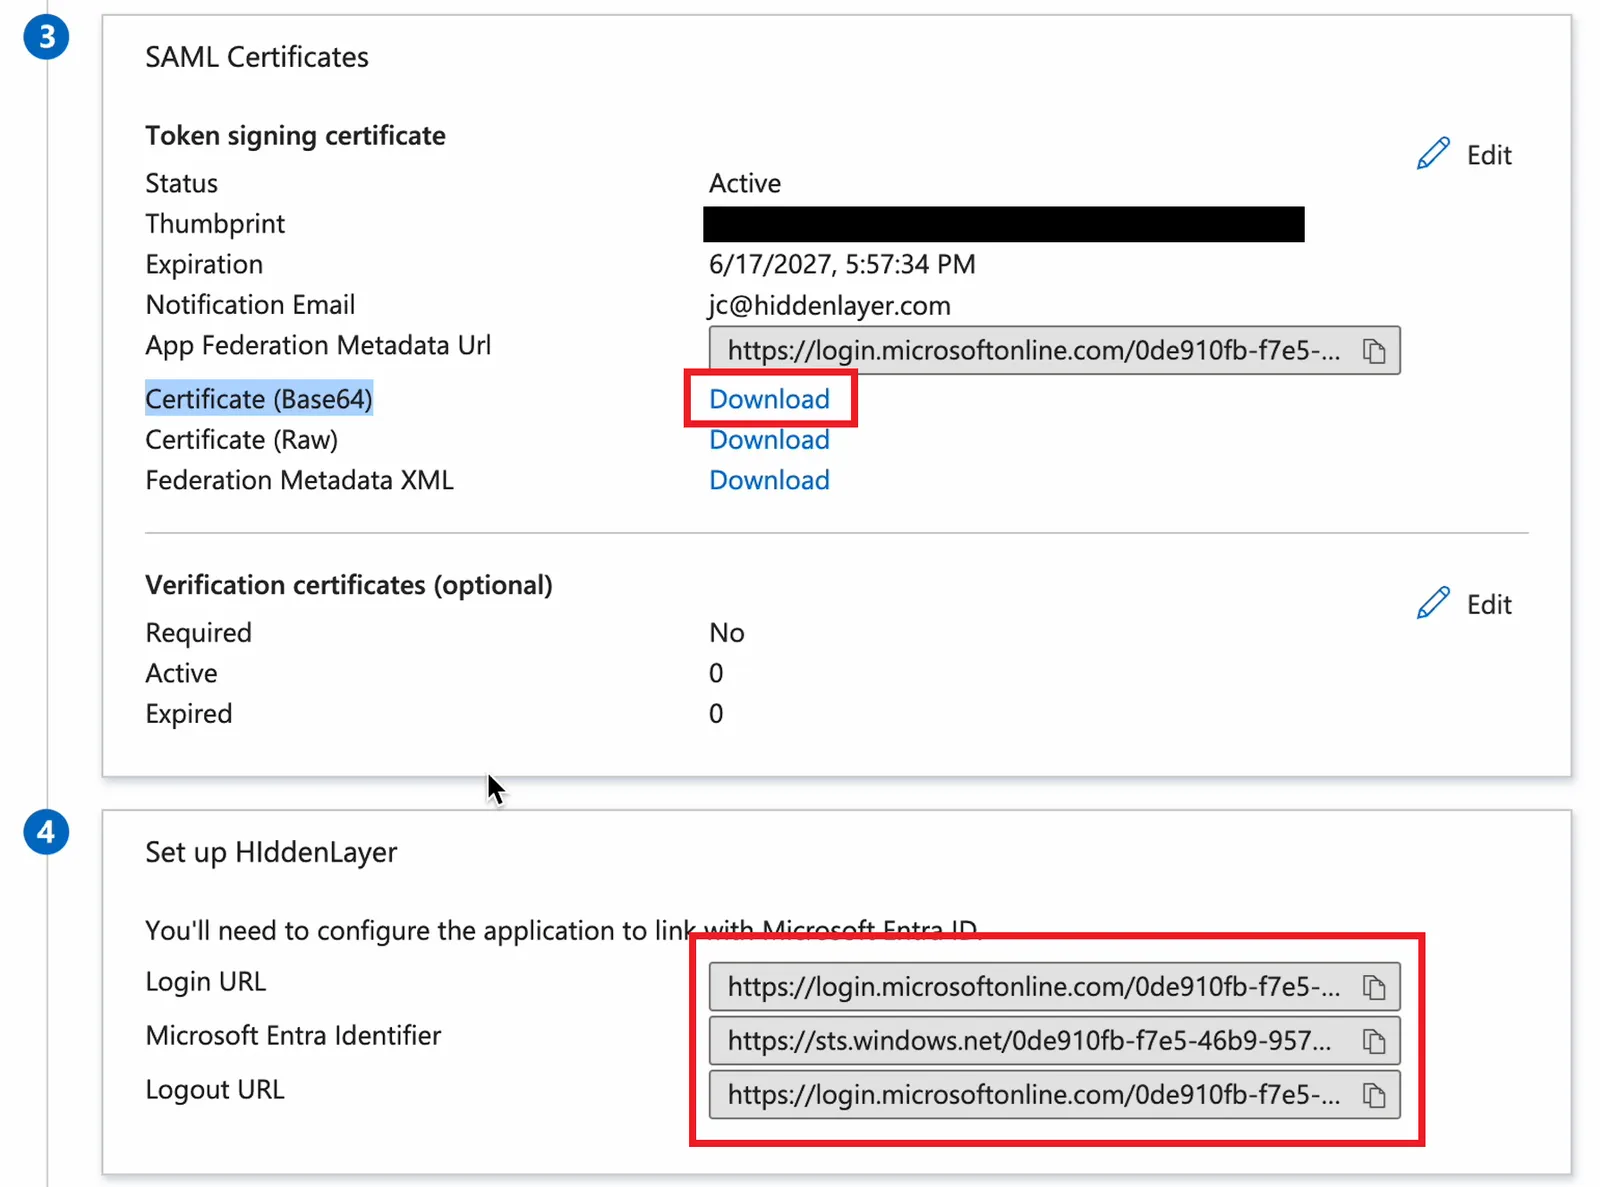
14. In the HiddenLayer Console, copy and paste the following information on the **Configure SAML SSO** tab on the **Settings > SSO** page.
* From Set up HiddenLayer (or the name you gave the application):
* Login URL
* Microsoft Entra Identifier
* Logout URL
* From SAML Certificates:
* Certificate (Base64)
* The following example images show where to find the above information in the Azure console.
### Okta
#### Prerequisites
Before creating an app integration in Okta, you need the following information from **Settings > SSO > Configure SAML SSO** in the HiddenLayer Console:
* **Single sign-on URL** - This could be called the Secondary Assertion Consumer Service (ACS) Callback URL.
* **Audience URI (SP Entity ID)** - This could be called the Issuer.
* **Signature Certificate** - This could be called the Request Signing Certificate.
#### Create App Integration
After receiving the SSO information from HiddenLayer, create an application integration in Okta.
1. In the Okta console, select **Applications > Applications**.
2. Click **Create App Integration**.
3. For Sign-in method, select **SAML 2.0**.
4. Click **Next**.
5. Enter a name for the integration, then click **Next**.
* Optionally, upload an icon for the app.
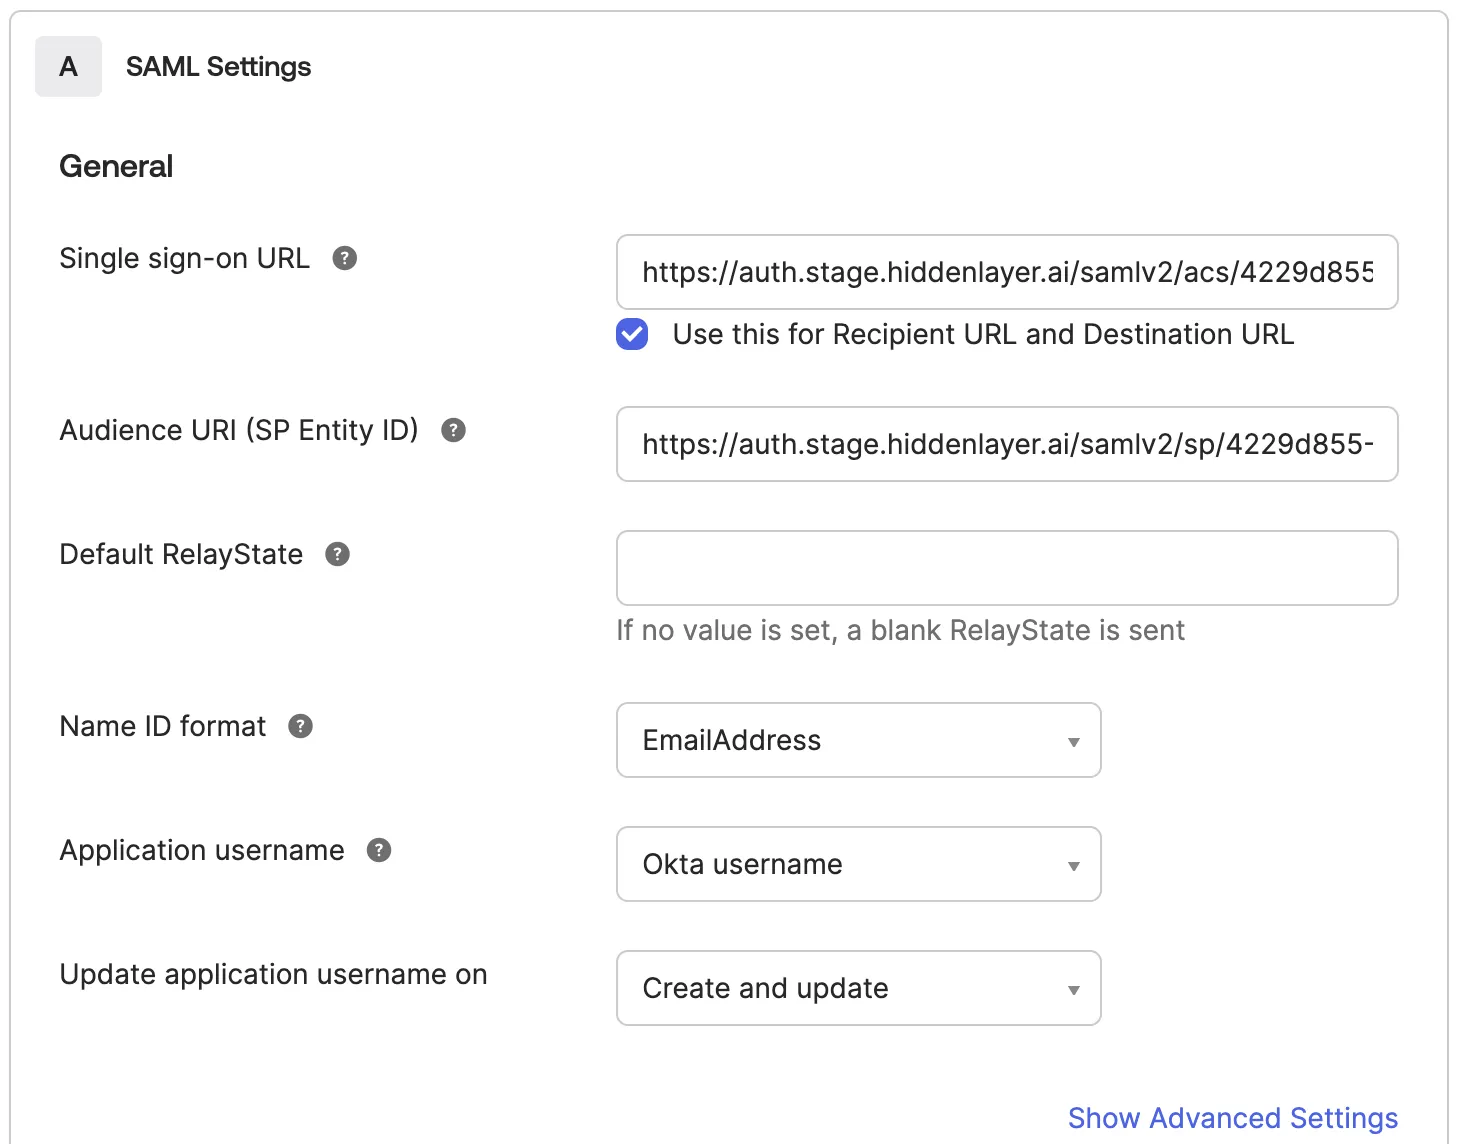
6. Enter the SAML settings for the integration.
* Enter the **Single sign-on URL** provided by HiddenLayer.
* This is the **Secondary Assertion Consumer Service (ACS) Callback URL**.
* Leave the box checked to “Use this for Recipient URL and Destination URL.”
* Enter the **Audience URI (SP Entity ID)** provided by HiddenLayer.
* This is **Issuer**.
* Set Name **ID format** to “EmailAddress.”
* Click **Show Advanced Settings**.
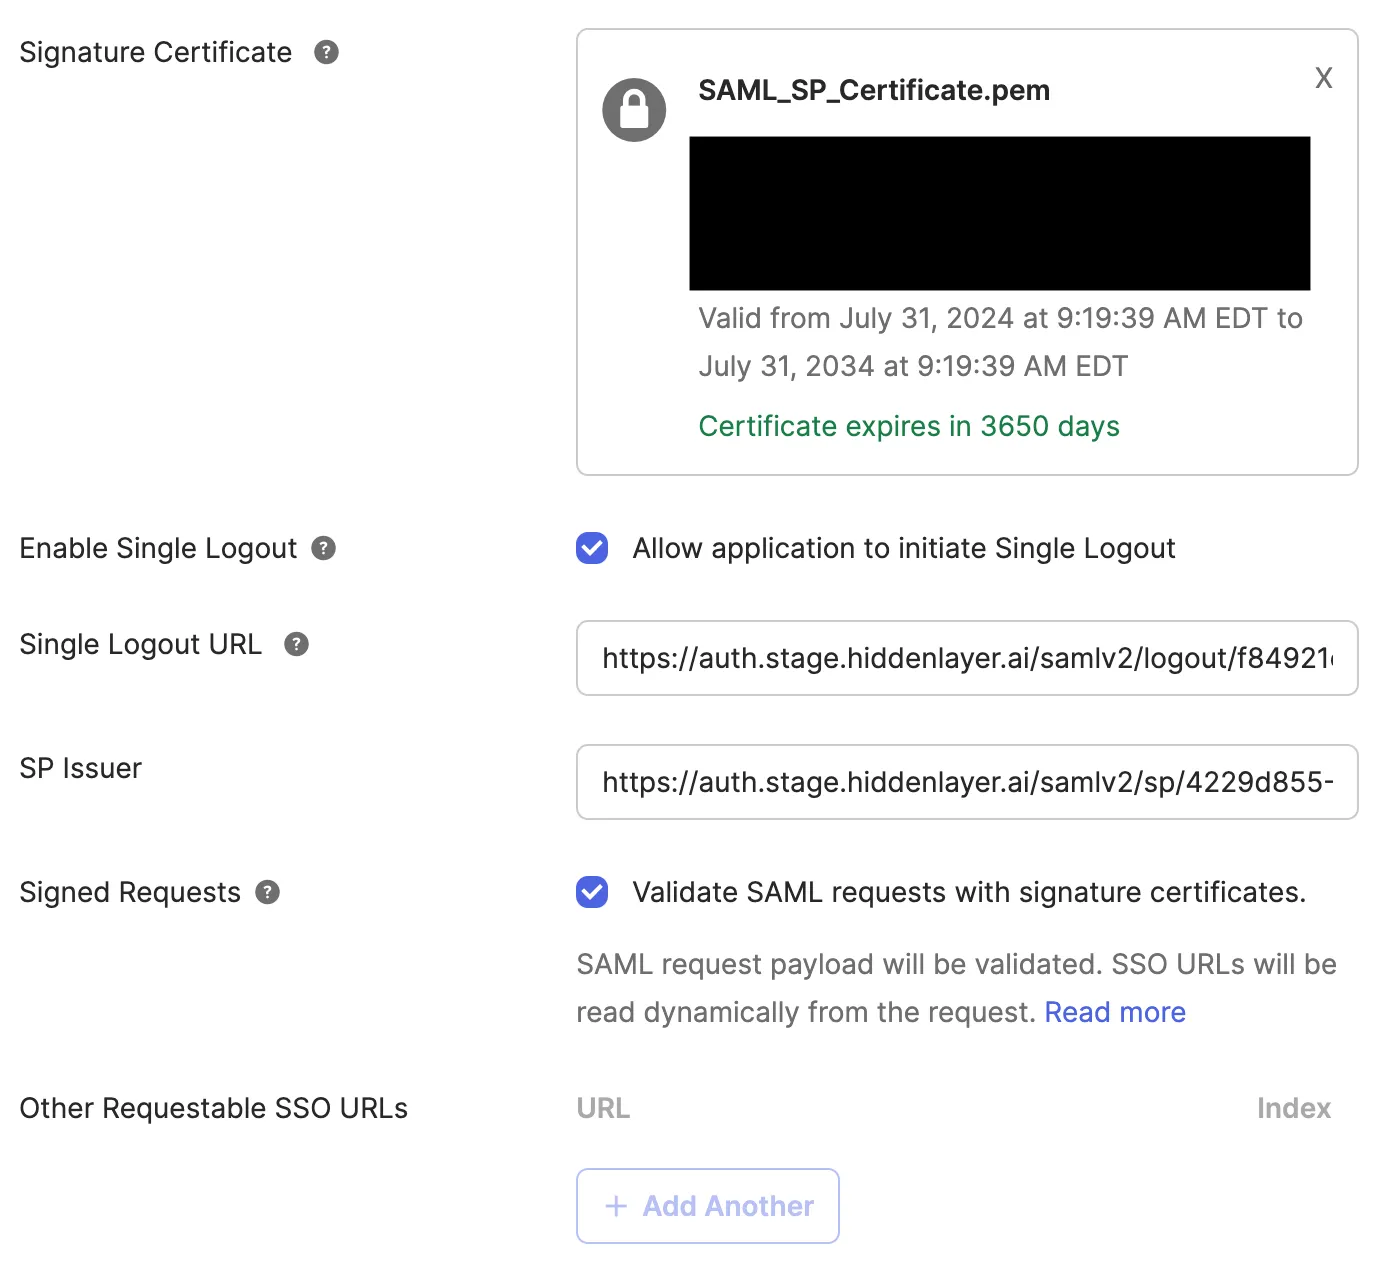
* Set up SP Request validation by certificate:
* For the **Signature Certificate**, do the following:
* Create a text file with a PEM extension (.pem).
* Copy and paste the **Request Signing Certificate** from the HiddenLayer Console.
* Save the PEM file.
* Upload the file to Okta.
* Under **Signed Requests**, check “Validate SAML requests with signature certificates.”
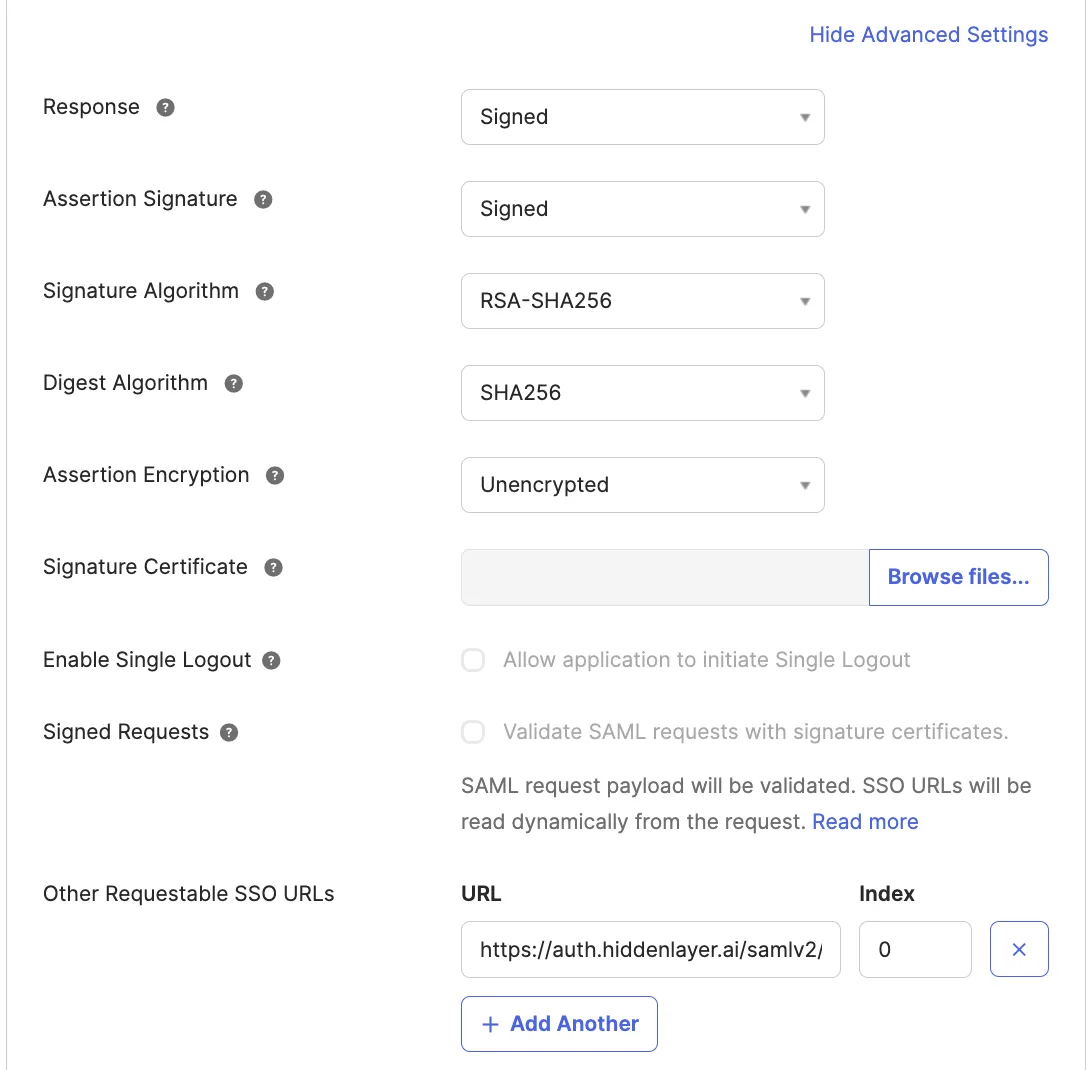
* Alternative approach: If use of the request signing certificate is not desired for some reason, the service provider can be authenticated by callback URL. To do this, use a **“Requestable SSO URL”** as follows. (Note this will be disabled if certificate validation is set.)
* For Other **Requestable SSO URLs**, click **Add Another**.
* Enter the **Other Requestable SSO URL** provided by HiddenLayer.
* This could be called the **Secondary Assertion Consumer Service (ACS) Callback URL**.
* Enter zero for **Index**.
7. Click **Next**.
8. Optionally, under **Help Okta support understand how you configured this application**, select **It’s required to contact the vendor to enable SAML**. This is not required.
9. Click **Finish**. The app integration is created and the SAML 2.0 settings display.
10. Click on the **Sign On** tab and under SAML 2.0 click **More details**. Copy the following:
* Sign on URL
* Issuer
* Signing Certificate
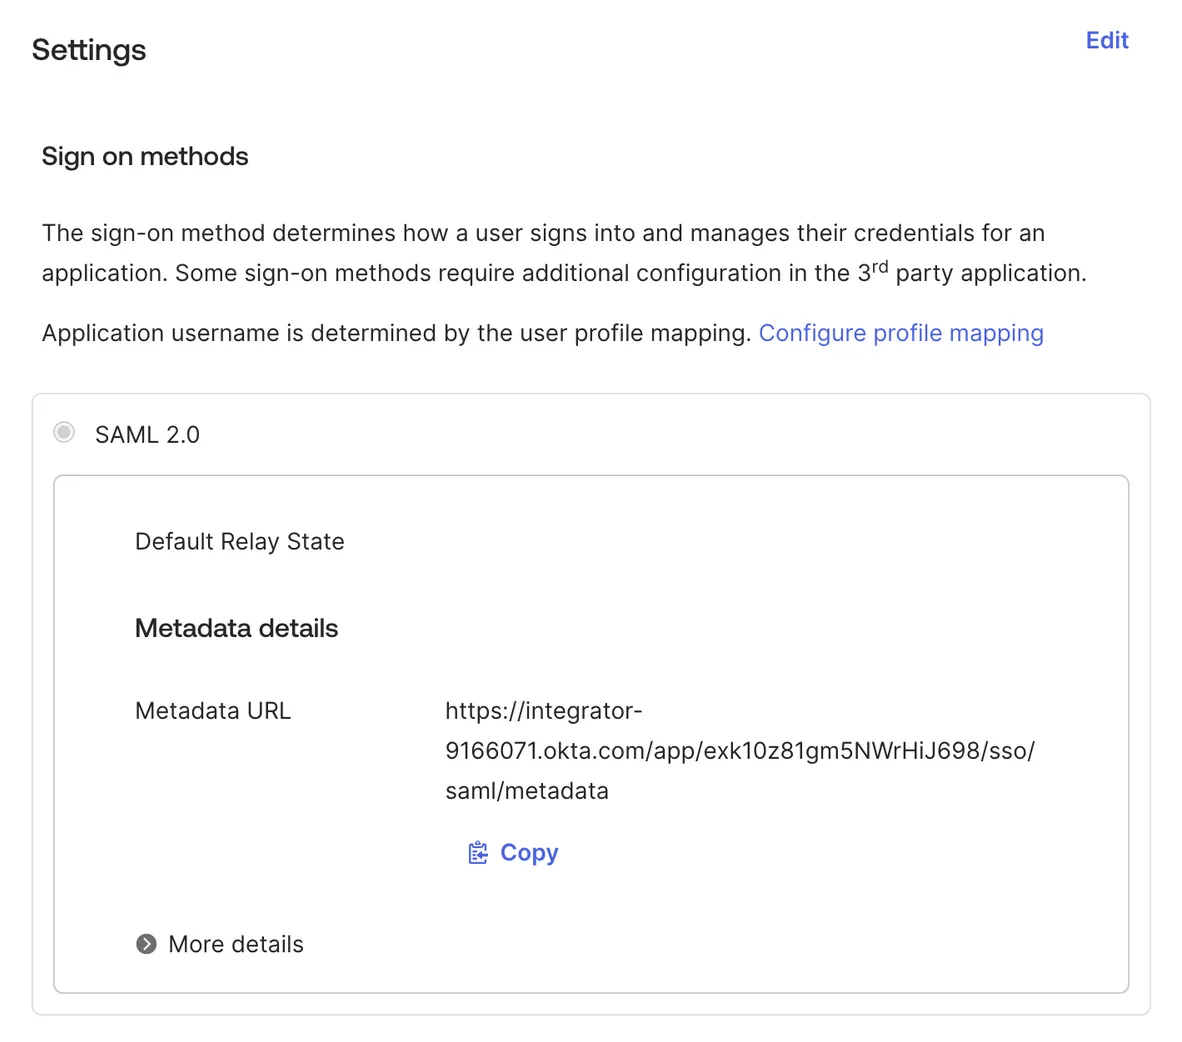
* Paste the above information to the Configure SAML SSO tab on the SSO page in the HiddenLayer Console.
* Sign On URL maps to IdP SSO URL
* Issuer maps to Issuer
* Signing Certificate maps to Provider Public Certificate
* Ensure that -----BEGIN CERTIFICATE----- and -----END CERTIFICATE----- are present when pasting the certificate
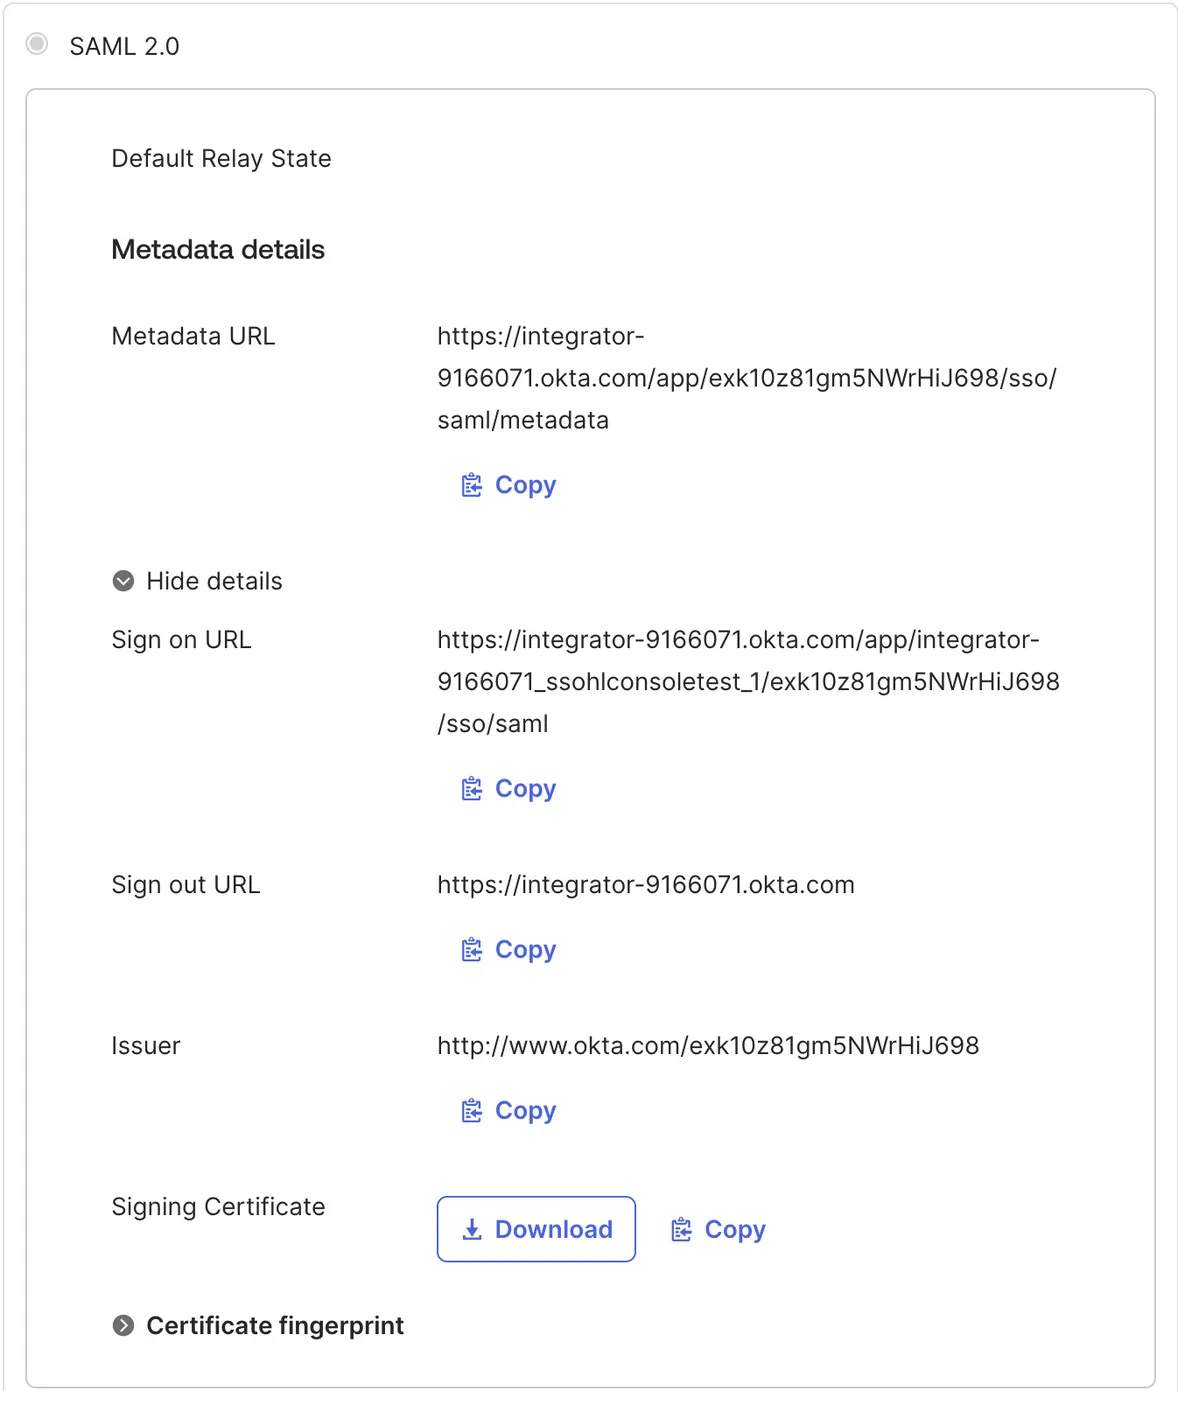
11. After the Okta app integration is created, be sure to assign users or groups to the app integration.
#### Attribute Statements (Optional)
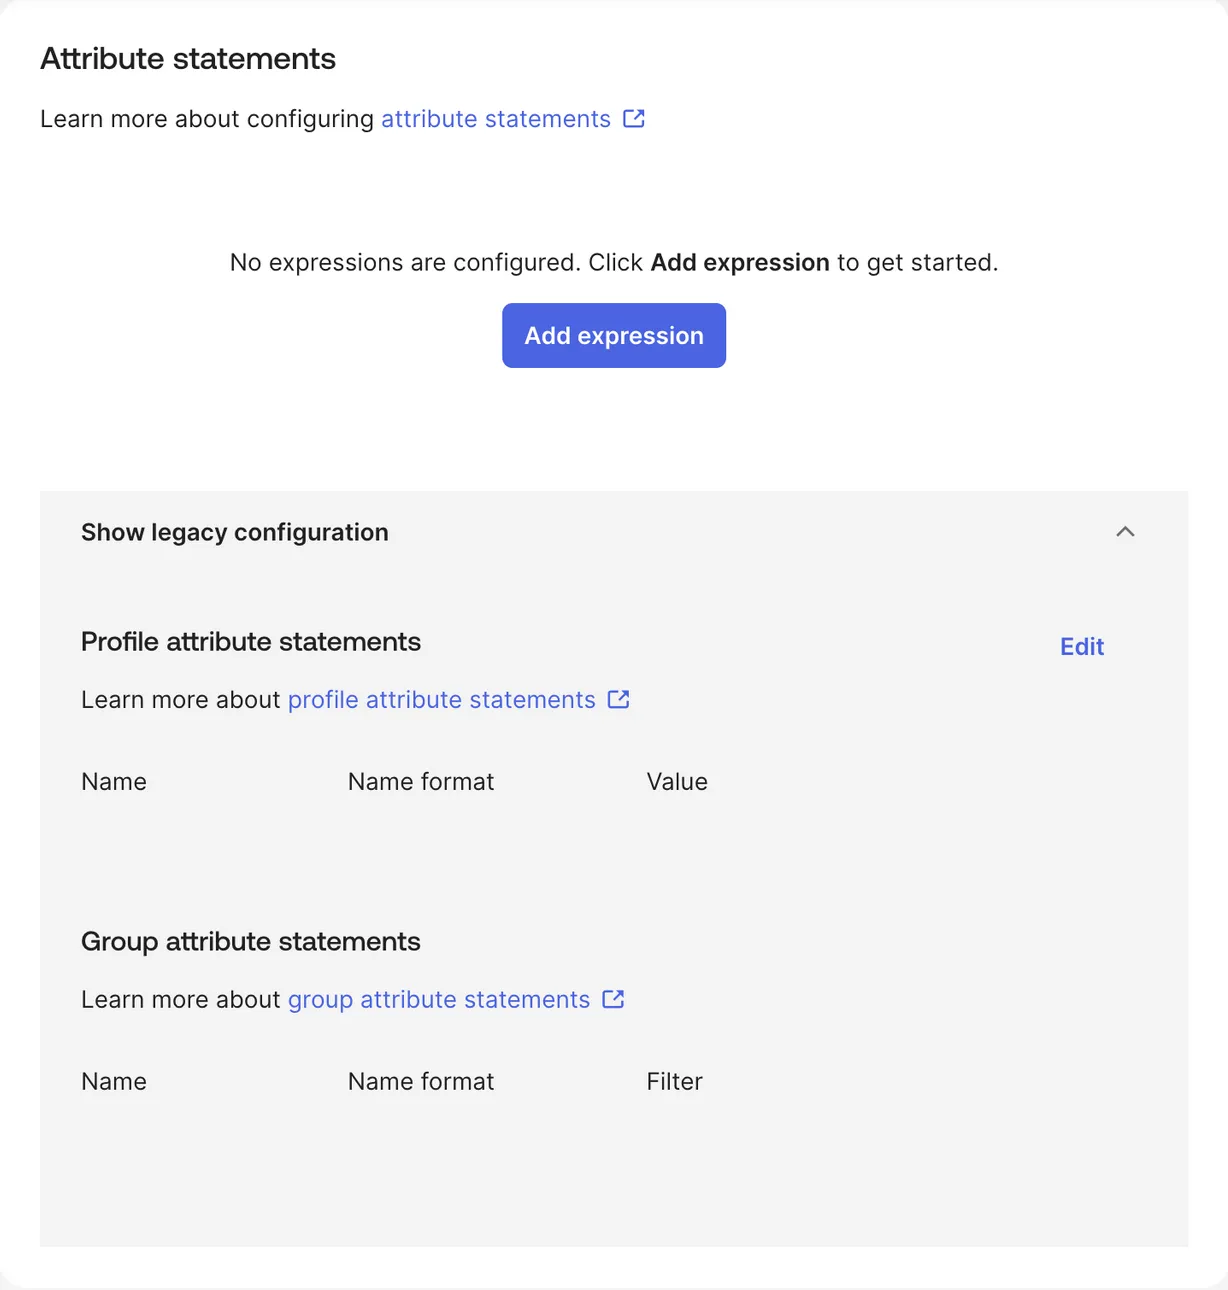
The following settings are for Okta attribute statements, which are SAML assertion components used to pass user-specific data (like email or roles) from Okta to a SAML application during authentication.
* Under **Attribute Statements (optional)**, add a firstName.
* For Name, enter **firstname**.
* For Name format, select **Basic**.
* For Value, select `user.firstName`.
* Under **Attribute Statements (optional)**, add a `lastName`.
* For Name, enter **lastname**.
* For Name format, select **Basic**.
* For Value, add the values that match your environment. Example: `user.lastName`.
* Under **Attribute Statements (optional)**, add an `email`.
* For Name, enter **email**.
* For Name format, select **Basic**.
* For Value, add the values that match your environment. Example: `user.email`.
* Under Attribute Statements (optional), add `Roles`.
* For Name, enter **Roles**.
* For Name format, select **Basic**.
* For Value, add `appuser.roles`.
#### User Profile Configuration for RBAC
You can configure the HiddenLayer OKTA application to pass all groups for role-based access control (RBAC).
1. Edit the HiddenLayer User Profile in OKTA.
2. Go to **Directory > Profile Editor**, then click **Add Attribute**.
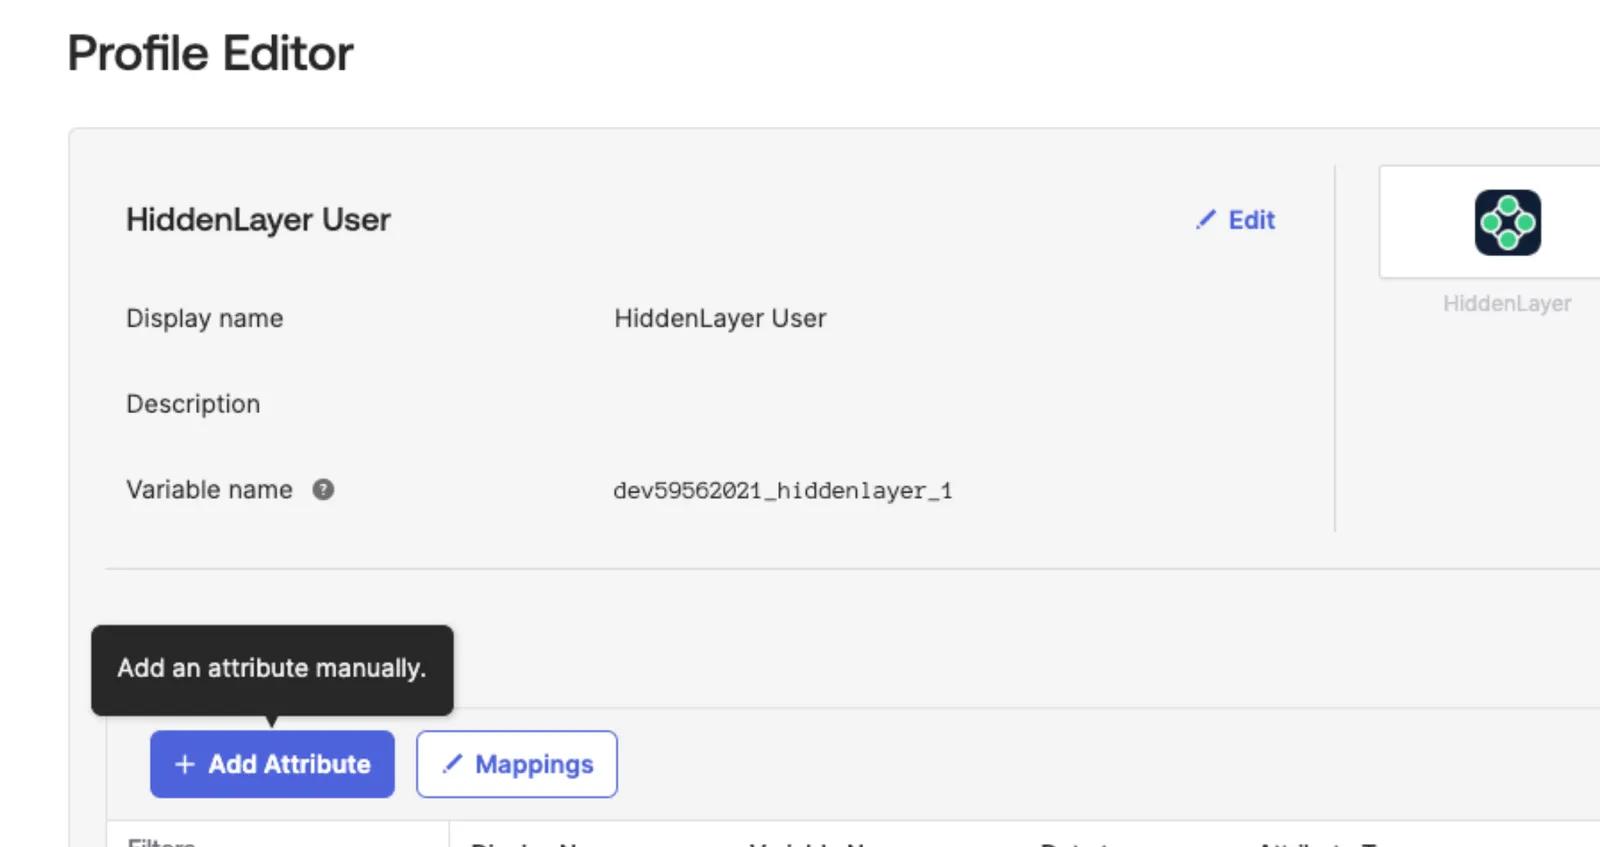
3. Configure the Attribute as follows. Also see the image below. For more information about custom attributes in an Okta user profile, see [Okta's documentation](https://help.okta.com/en-us/content/topics/users-groups-profiles/usgp-add-custom-user-attributes.htm).
* Data type: string array
* Display name: Role
* Variable name: role
* Description: HiddenLayer Role
* Enum: Enable **Define enumerated list of values**
* Attribute Members: Add the following **Display name : Value**
* Org Admin : admin
* User Admin : user-admin
* Analyst : analyst
* Viewer : viewer
* Attribute required: Yes
* Attribute type: Group
* Group Priority: **Combine values across groups**
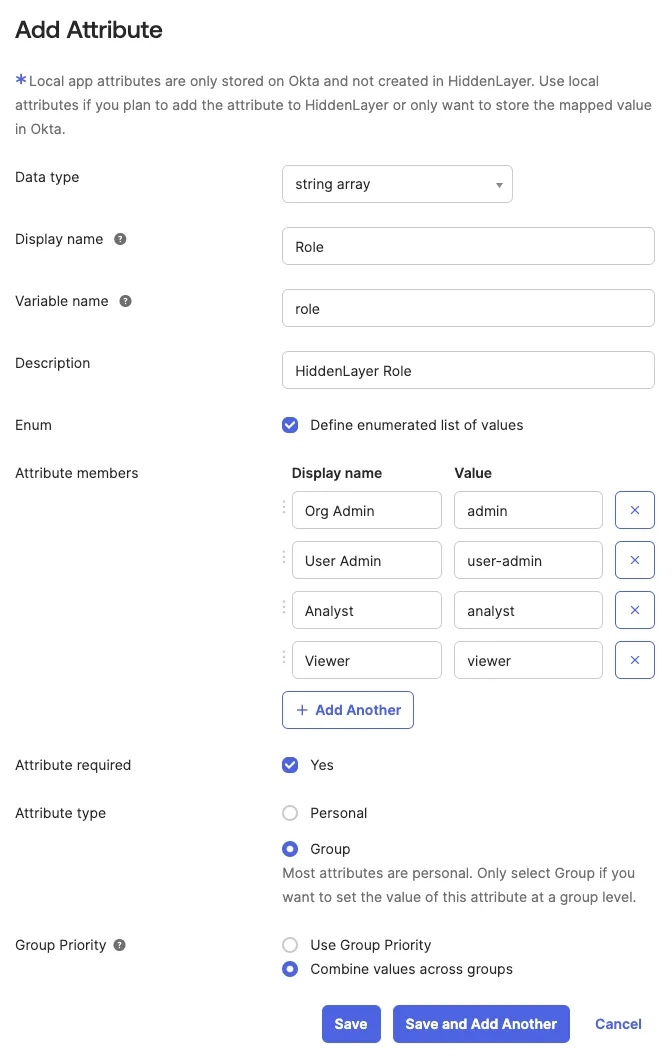
4. Click **Save**.
5. Assign groups to the Application.
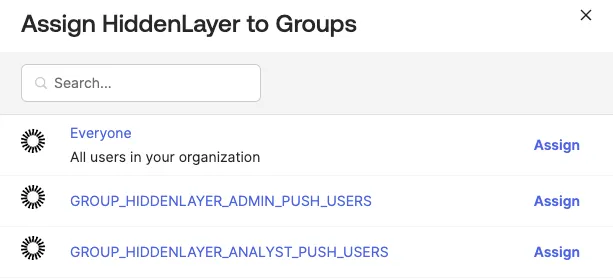
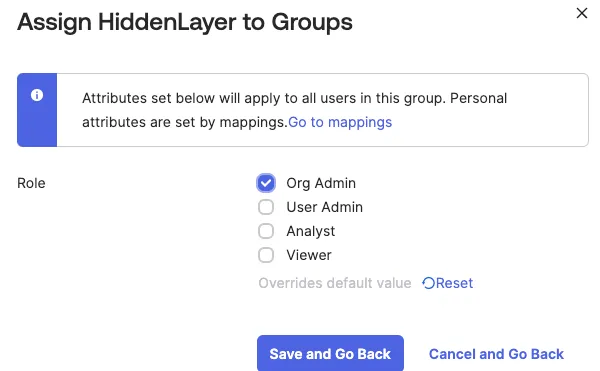
6. Specify the HiddenLayer Role to assign to the group.